VirtualBox – Cannot Register the Hard Drive Because a Hard Disk With UUID Already Exists

I frequently use virtualization to run a Linux instance within my Windows instance. It provides a whole host of benefits and is really a wonderful thing, I can’t explain how great it is to seamlessly move between different operating systems. But that’s when it works… Today I was attempting to move my Linux virtual hard drive off my SSDs and onto my portable hard drive when I received an error that said I could not register the hard drive because a hard drive with UUID already exists. Bummer, right? So off I went to Google and after a little digging I found out that isn’t difficult to fix this issue, just a couple quick commands is all you need:
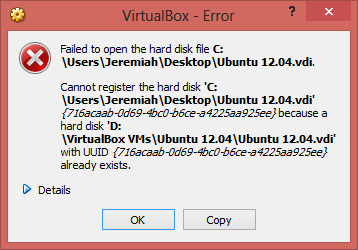
  1. Open up the Command Prompt (cmd.exe) by searching for it in the Windows search box or pressing the Windows Key + R and typing “cmd”
  2. Change to the directory where VirtualBox is installed. For example mine was installed in “C:\Program Files\Oracle\VirtualBox”, so I did:
    1
    
    cd C:\Program Files\Oracle\VirtualBox
    
  3. Run the following command, replacing with the path to wherever your new copy of the hard drive is:
    1
    
    VBoxManage.exe internalcommands sethduuid "<path to hd>"
    

That’s it! After that, you should be able to add the hard drive to your system without any issue.

Valve Data Format VDF to JSON

Valve stores a lot of its data for games in VDF format, its own internal data format that is very JSON-esque. I first ran into it parsing through the items_game.txt file for Dota 2.

So today I created a quick PHP script which will allow you to create valid JSON from VDF data, so you can parse it much more easily and hopefully make better use of it!


For those who would like to do this, but in a separate language here’s the series of regular expressions I applied, after first encapsulating the entire string in curly braces. NB: ${n} in the replacement is specifying a callback where n is the n’th matched item in the expression. There may be a different call back specification in your preferred language.

1
2
3
4
5
6
7
8
9
10
1) pattern: '/"([^"]*)"(\s*){/'
   replacement: '"${1}": {'
2) pattern: '/"([^"]*)"\s*"([^"]*)"/'
   replacement: '"${1}": "${2}",'
3) pattern: '/,(\s*[}\]])/'
   replacement: '${1}'
4) pattern: '/([}\]])(\s*)("[^"]*":\s*)?([{\[])/'
   replacement: '${1},${2}${3}${4}'
5) pattern: '/}(\s*"[^"]*":)/'
   replacement: '},${1}'

To the best of my knowledge these regular expressions cover all of VDF, but I cannot guarantee they will work forever. However if it ceases to work I will update it as soon as I notice/am informed.

DigiPIN

I had a few minutes to spare today, so I made a simple digital PIN input utility. This utility, DigiPin, is a jQuery plugin. The purpose is to subvert programs like key loggers which might monitor your keyboard input. Also, it randomizes number locations after every input. Check it out if you’re interested: https://github.com/AlienHoboken/DigiPIN

Shortening File Path With Javascript

I ran across this question on Stack Overflow, and I decided to address it: http://stackoverflow.com/questions/14308792/how-to-truncate-a-string-containg-a-path-without-touching-the-filename The problem is basically trying to shorten a file path to a specified length using, while maintaining the filename and the originating drive (clearly meant for Windows application). Here is what I came up with: http://jsfiddle.net/AlienHoboken/y7SgA/ What it does is pretty simple. First, it splits the string on slashes, so we can get the drive letter and file name as the first and last elements.

1
2
3
var tokens = str.split("\\");
var drive = tokens[0];
var fileName = tokens[tokens.length - 1];

Then it takes these items and calculates the length they take up, and finds our remaining length from max length.

1
2
3
var len = drive.length + fileName.length;
//remove the current lenth and also space for 3 dots and 2 slashes
var remLen = maxLength - len - 5;

If we have any length left, ie. we can use some of the intermediary path, it tries to do so. Else it just gives back a path with the drive letter and filename only. The first step of shortening the the intermediary path is to remove the first and last elements, as we are already using them, then join the tokens back together into a string.

1
2
3
4
5
//remove first and last elements from the array
tokens.splice(0, 1);
tokens.splice(tokens.length - 1, 1);
//recreate our path
var path = tokens.join("\\");

Then we need to get the lengths of the first and second sections for the shortened path, the text around our eventual ellipses. In the event the remaining length is an odd number, ceiling one value and floor the other.

1
2
3
//handle the case of an odd length
var lenA = Math.ceil(remLen / 2);
var lenB = Math.floor(remLen / 2);

Finally we rebuild our now shortened path. Taking lenA characters from the front and lenB characters from the end. Then use these parts and put them together with our ellipses and drive / filename to form our new shortened path!

1
2
3
4
//rebuild the path from beginning and end
var pathA = path.substring(0, lenA);
var pathB = path.substring(path.length - lenB);
path = drive + "\\" + pathA + "..." + pathB + "\\" + fileName;

Not too hard of a task, but an interesting one that gives a good example of string manipulation.

Java Sound Playback

Hey again. So I was looking around on how to play sounds through Java via Google and I couldn’t many easy to comprehend explanations. There is a lot more to it than is presented here, but for simple play back of a sound file with no “fancy” stuff this is the way to do it. First an explanation, then the code. Playing a sound file is actually rather easy, thanks to the Clip class. First thing you do is create an AudioInputStream from a file, of course this file is YOUR audio file. I just have a constant clip_loc pointing to its location on disk. NOTE: You can also use a URL instead of a file. After we have our AudioInputStream, we create our clip. We use getClip() from the AudioSystem class, then open our AudioInputStream for the clip, then just use the clips start() method to play it. It’s that simple! After that we have a set of empty while loops. These loops just serve to block execution while the clip is playing. ie. keep the program open until the clip finishes playing. If your program will stay open anyways, then you will want to remove these lines and place the clip’s close() method in an appropriate place. After the loops, the clip closes to release resources and we’re done! That simple. Also, you’ll notice the entire code was wrapped in a try statement. Feel free to throw the exceptions instead. Also, I used a generalized catch to handle all the Exceptions. This is not good practice, but it made the code simpler. Really you’d want to catch each exception and handle it individually.

Java Sound Playback Example
1
2
3
4
5
6
7
8
9
10
11
12
13
14
15
16
17
18
19
20
21
22
23
24
25
26
27
28
29
30
31
import javax.sound.sampled.*;
import java.io.File;
/**
 * @author Jeremiah Johnson
 */
public class SoundTest {
    //where our sound file is located
    final static String  clip_loc = "clips\\Godzilla.wav";
    public static void main(String[] args) {
        try {
            //creates the AudioInputStream from our file
            AudioInputStream audio = AudioSystem.getAudioInputStream(new File(clip_loc));
            //Creates the clip opens it for use, then starts it
            Clip clip = AudioSystem.getClip();
            clip.open(audio);
            clip.start();
            /* The next two lines are only needed if your program will not stay
             * open as the clip plays. The first line just is a small pause before
             * the second line. The second line just keeps the program open while
             * the clip plays.
             */
            while(!clip.isRunning());
            while(clip.isRunning()) {
                Thread.yield();
            }
            clip.close(); //clean up
        } catch ( Exception e ) { //Generalized catch-all. Not good practice, but less typing
            System.out.println(e.getMessage());
        }
    }
}

Java Prime Factorization Algorithm Using Recursion

I happened over some having a problem with a prime factorization algorithm http://ubuntuforums.org/showthread.php?t=2062201. It inspired me to actually use my blog. Prime factorization is easy to conquer, if you just think recursively. I’m not saying this is the implementation which will give the absolute best running time, but it’s easy to wrap your head around and gives a good idea of how to use recursion. First, the code:

Java Prime Factorization USing Recursion
1
2
3
4
5
6
7
8
9
10
11
12
13
14
15
16
17
18
19
20
21
22
23
24
25
26
27
28
29
30
31
import java.util.ArrayList;
import java.math.BigInteger;
public class PrimeFactorization {
  private static ArrayListprimes = new ArrayList();
  public static void main(String[] args) {
      BigInteger start = new BigInteger("600851475143");
      recurse(start);
      for(int i = 0; i < primes.size(); i++)
          System.out.print(primes.get(i).toString() + ", ");
  }
  public static void recurse(BigInteger num) {
      BigInteger i = new BigInteger("2");
      //we use these as "constants" later
      final BigInteger zero = new BigInteger("0");
      final BigInteger one = new BigInteger("1");
      //base case, num = 2; reuse i on our way
      if(num.equals(i)) {
          primes.add(i);
          return;
      }
      for(; !num.mod(i).equals(zero); i = i.add(one)) {
          if(num.subtract(i).subtract(i).signum() == -1) { //this number is prime
              primes.add(num);
              return;
          }
      }
      //we found two divisors, recurse them
      recurse(i);
      recurse(num.divide(i));
  }
}

So this is pretty simple to follow. It starts with a number, then just sends it to the recursive method. If the number = 2, which is our http://en.wikipedia.org/wiki/Base_case, then it is obviously prime and we add it to our array of prime numbers. If not, we start at two for our counter and keep adding one until we get a number that evenly divides into our target number.!num.mod(i).equals(zero) Or, if we go past the mid point if(num.subtract(i).subtract(i).signum() == -1) we know it is a prime number by deductive reasoning: If you start at 2 (which when the number is divided by 2 yields half the number), then go past half the number there is no way you can even divide into the number. If it is prime, we add it to the array and return, breaking out of this recursive dive. Else, if we found two divisors, we recurse through both of them to get their prime factorizations. Because the prime factorization of any number is equal to the prime factorization of its factors. That’s all for today. Any questions or comments feel free to respond!

Hello World, or at Least a Small Part of It!

Hey! I just started a blog! Awesome right? I’m like a reverse trend-setter. If you’re viewing this, you’re either interested in me/my work, a bot, or a real creeper. I’m probably only cater to the first category, sorry bots and creepers. =[ I don’t have much else to say, so keep checking back or subscribe to my http://jwjdev.com/blog/atom.xml! Keep being awesome, Jeremiah